
You know that underused downstairs corner that currently stores board games and a dusty treadmill? It’s begging to become a basement kitchenette.
Whether you dream of an espresso bar, a snack station for movie nights, or a full-blown mini-chef’s zone, you can make it happen—smart, stylish, and without a full renovation meltdown.
Here are 12 basement kitchenette ideas that blend function and style, plus tons of real-life tips you can use this weekend. Ready to turn “meh” into “my new favorite room”?
Let’s go.
1. The Compact Coffee Bar That Doubles As a Snack HQ
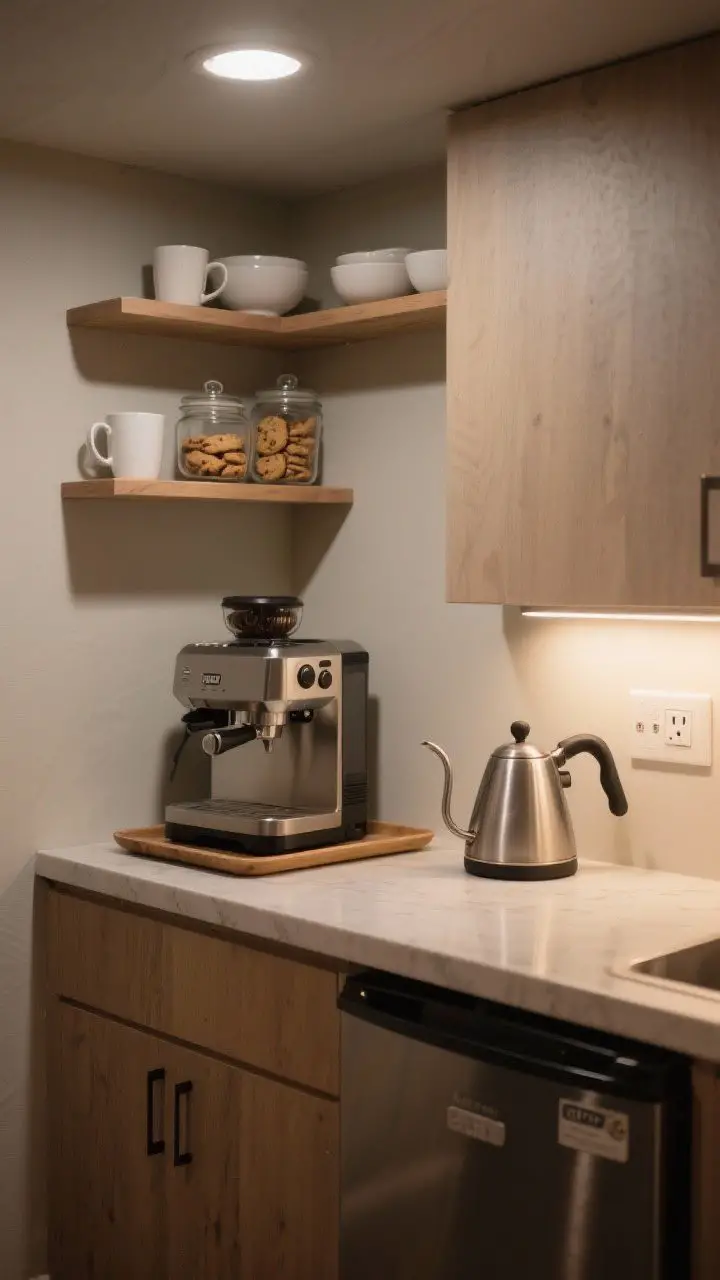
If your basement is more cozy than cavernous, build a mini coffee bar with a small counter, wall shelves, and a mini fridge. Keep mugs, pods, and snacks right where you need them. Bonus: late-night cappuccino without waking anyone upstairs.
What to Include
- Counter-depth mini fridge for creamers and sparkling water.
- Open shelves for mugs, bowls, and cute jars of biscotti.
- Compact espresso machine or pour-over station with a gooseneck kettle.
Pro tip: Install a GFCI outlet near the counter and a motion-sensor under-cabinet light for early mornings. Use a tray to corral coffee gear so cleanup is one swipe.
2. The Wet Bar Glow-Up With Moody Lighting
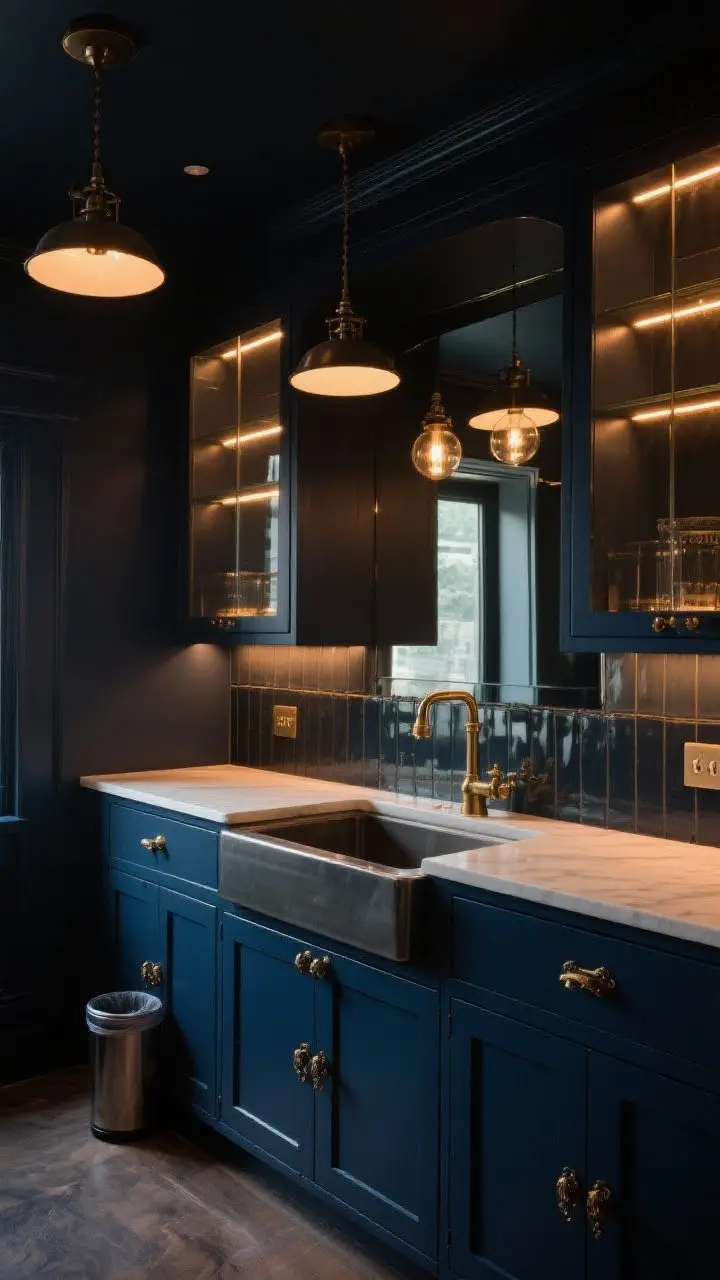
Turn a simple sink-and-fridge setup into a statement wet bar with a moody palette and layered lighting. Think deep navy cabinets, antique brass pulls, and a smoked mirror backsplash. Yes, drama belongs downstairs.
Lighting Layers That Matter
- Pendant lights over the counter for task lighting.
- LED strip lights inside glass-front uppers for that speakeasy vibe.
- Dimmer switches to go from party to movie mode fast.
FYI: A small bar sink keeps glassware out of your laundry sink (we’ve all been there). Add a pull-out trash next to it for citrus peels and cans.
3. The Airbnb-Ready Suite (Without a Full Kitchen)
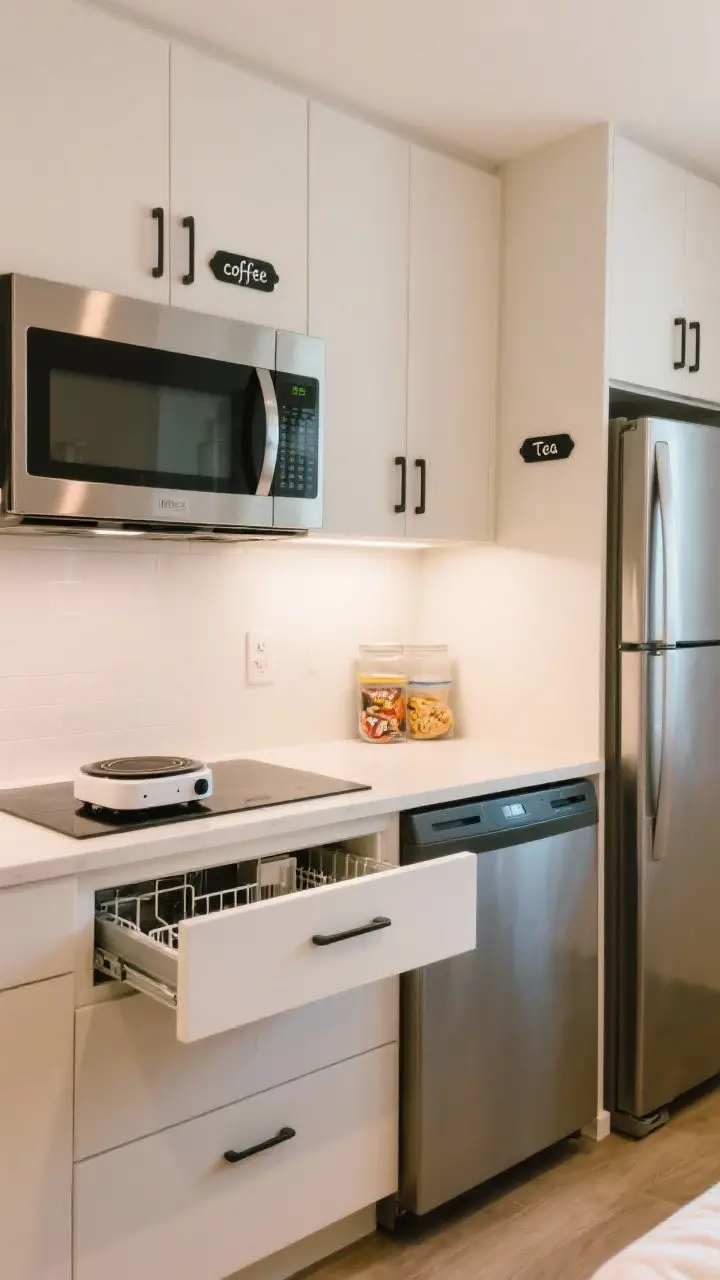
Hosting guests or renting the basement occasionally? Create an Airbnb-friendly kitchenette that’s code-compliant and fuss-free. You don’t need a range to make it legit—just plan smart.
Guest-Friendly Essentials
- Microwave drawer or counter microwave to save space.
- Induction cooktop (portable) for simple cooking—safe and sleek.
- Undercounter fridge/freezer drawer for longer stays.
- Compact dishwasher so guests don’t stockpile plates.
Pro tip: Label cabinets with chic tags (coffee, tea, snacks) so guests don’t go on a scavenger hunt. Add a soundproof rug upstairs if you’re worried about noise transfer.
4. The Movie-Night Snack Station With Built-Ins
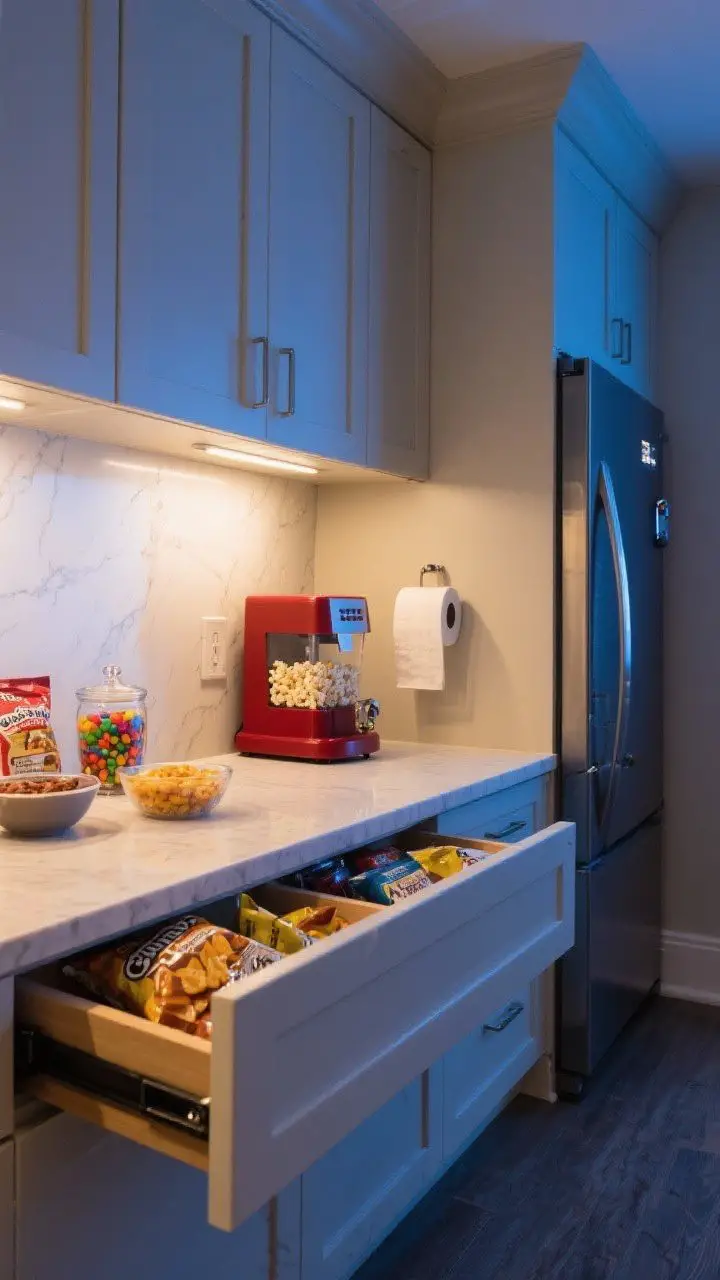
If your basement is home to the big screen, build a snack wall with deep drawers and a narrow countertop. Think popcorn maker, candy jars, and a beverage fridge—everything within reach when the opening credits roll.
Layout That Works
- Enclosed upper cabinets for stash-and-dash cleanup.
- Pull-out drawers for bags of chips and bowls.
- Counter-depth beverage fridge with a locking door if kids are around.
Pro tip: Use a wipeable quartz or compact laminate countertop—butter and caramel don’t stand a chance. Mount a paper towel holder under the uppers so it’s not cluttering the counter.
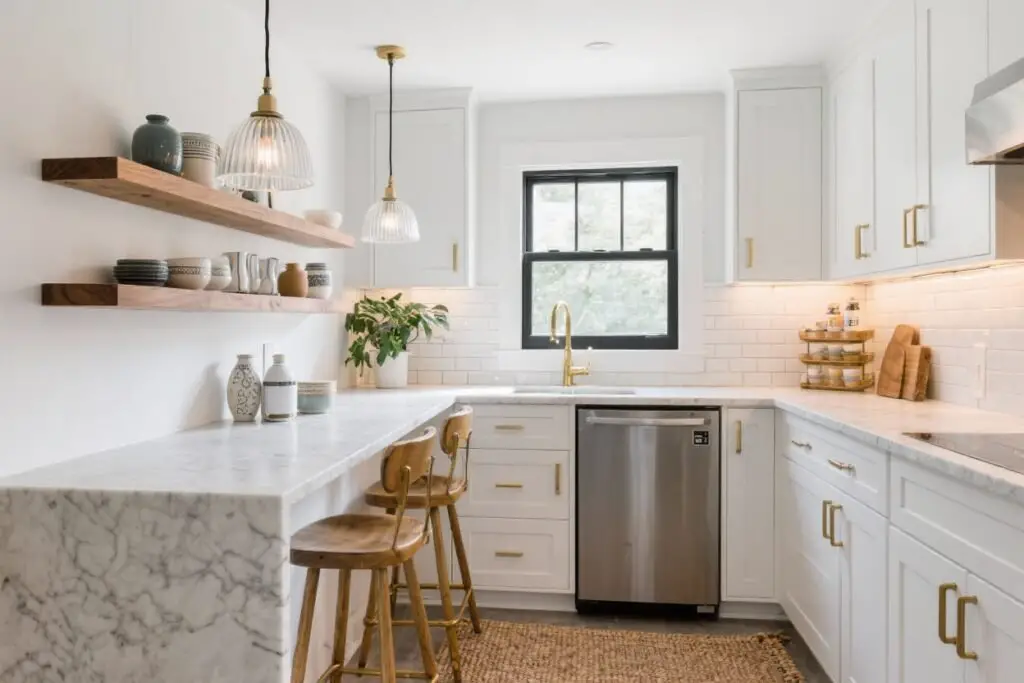
5. The Daylight Trick: Light Woods + Glossy Surfaces
Basements can feel cave-y, so design with light. Use white or pale oak cabinets, a glossy backsplash that reflects light, and warm LEDs.
Material Mix That Brightens
- Glossy subway tile or acrylic panels as a backsplash to bounce light.
- Maple or white oak cabinet fronts with integrated pulls.
- Warm 2700–3000K LEDs to keep the space cozy, not clinical.
Tip: A mirror-backed open shelf can fake depth, and a matte white ceiling is your best friend. Keep floors light—vinyl plank in a pale oak sets the tone.
6. The Industrial Loft Vibe With Metal + Brick
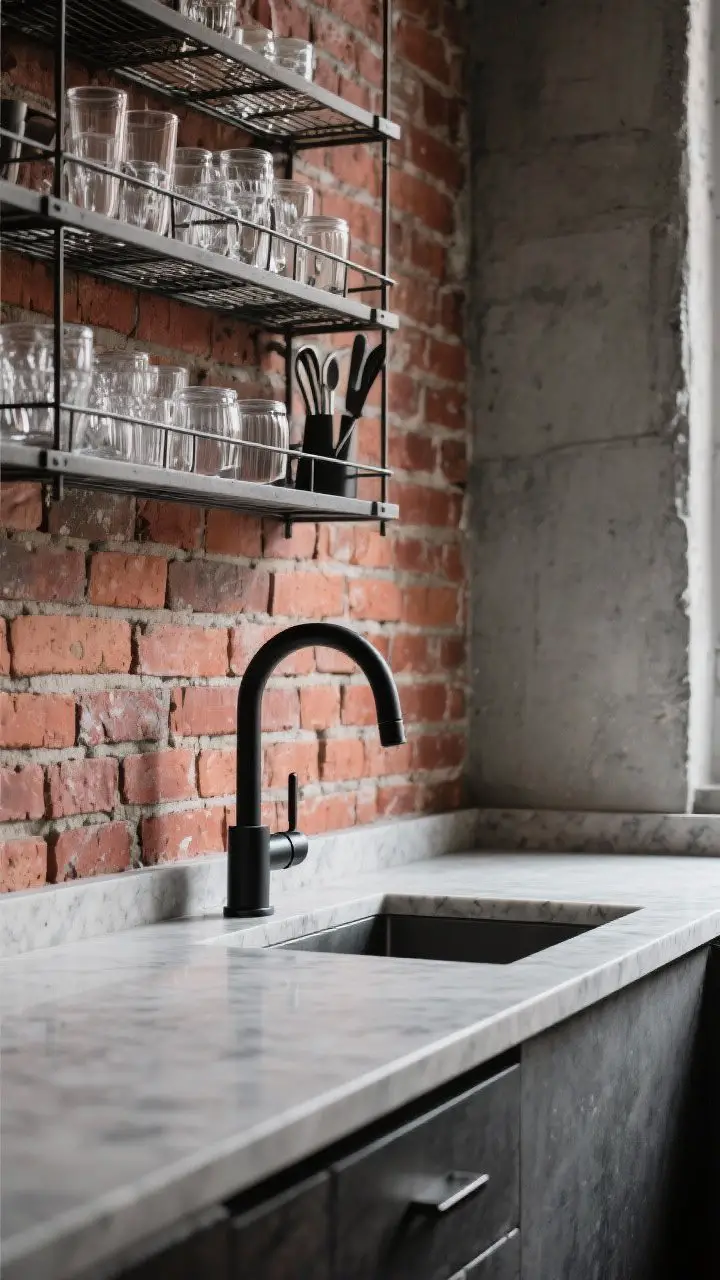
Want grit with your gruyère? Go industrial with black hardware, exposed brick (real or veneer), and wire shelving. It’s functional and looks expensive without trying too hard.
How to Nail the Look
- Concrete-look quartz or sealed concrete countertops.
- Open metal shelves for glassware and bar tools.
- Matte black faucet and handles to tie it together.
Note: If you don’t have brick, use a thin brick veneer or textured tile. Seal it to prevent dust, because no one wants gritty cocktails.
7. The Chef’s Mini-Prep Zone With Serious Storage
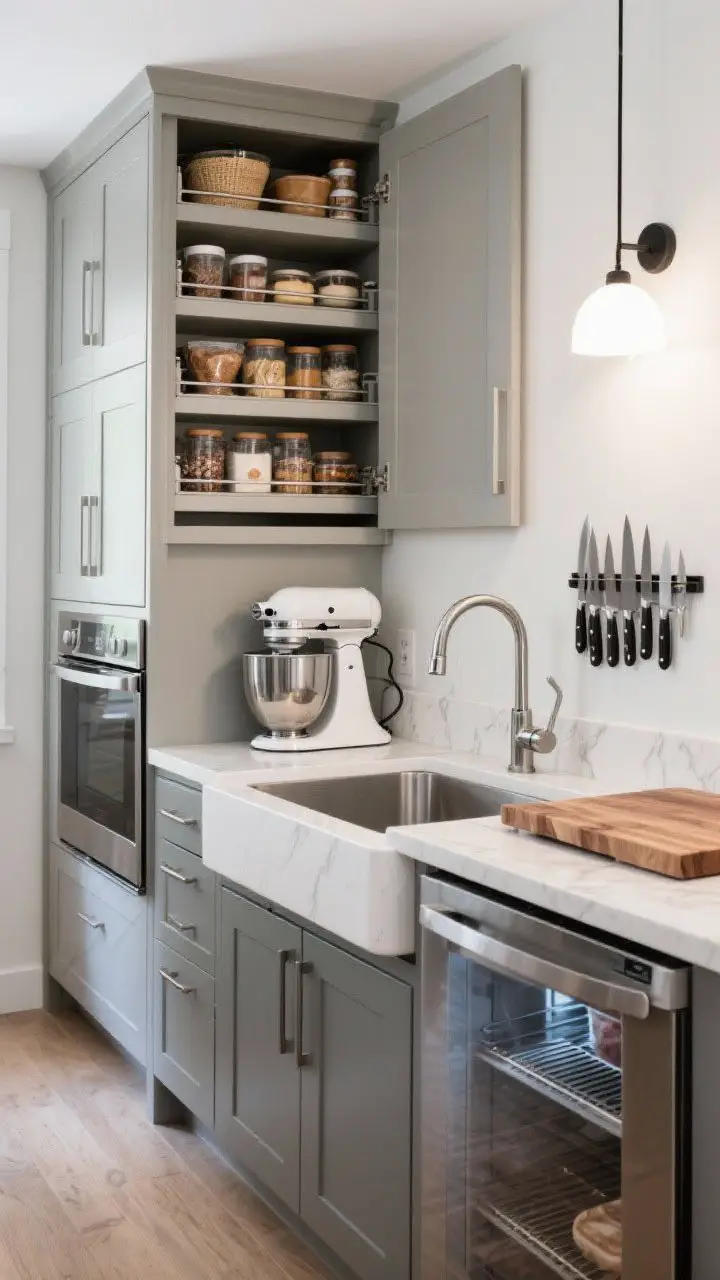
If you cook big upstairs, let your basement kitchenette be the prep and overflow station. Extra fridge space, a second sink, and storage for appliances you don’t use daily = sanity saved during holidays.
Smart Storage Adds Up
- Tall pantry cabinet with roll-outs for baking supplies and extras.
- Appliance garage for mixers, blenders, and air fryers.
- Deep sink with a pull-down sprayer for washing produce.
Pro tip: Add a butcher block insert for chopping and a wall-mounted magnetic knife strip—keeps counters clear and hands safe.
8. The Entertainer’s Peninsula With Space to Perch
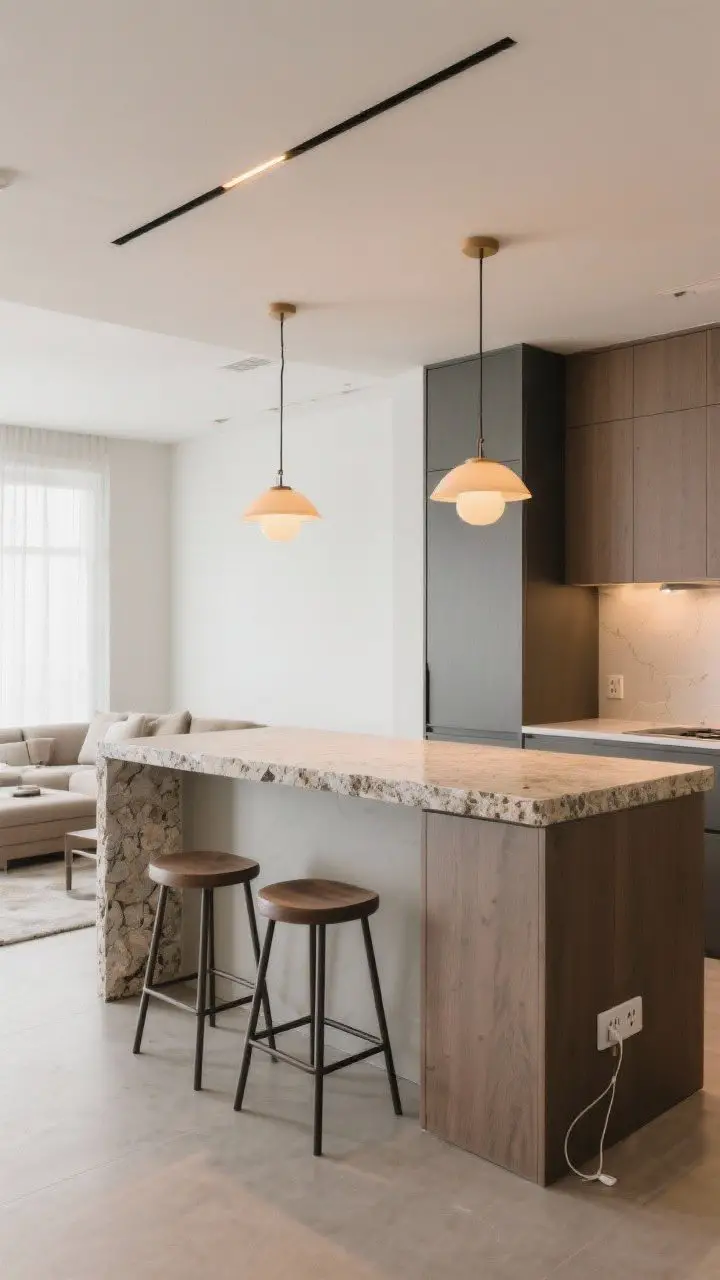
No room for a full island? Add a peninsula with a 12-inch overhang so friends can sit and chat while you pour drinks. It creates a natural zone between lounge and prep areas.
Details That Make It Work
- Waterfall edge to elevate the look (and protect corners).
- Backless stools that tuck under cleanly—space savers.
- Outlet on the side panel for chargers or a blender.
IMO: A peninsula is the hardest-working piece of furniture you’ll own. It’s a table, buffet, charging station, and landing pad—all in one.
9. The Hidden Pantry Wall With Camouflaged Appliances
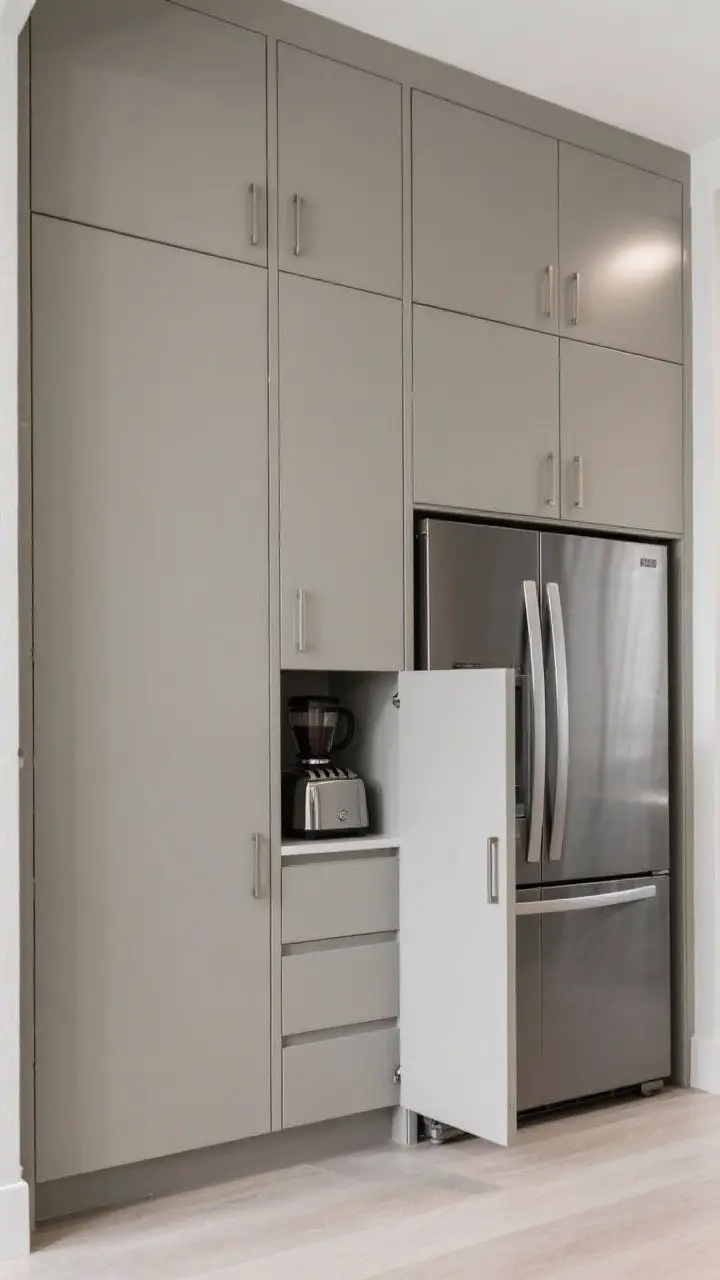
Love a sleek look? Hide everything behind tall, flat-front doors. Your fridge, microwave, and even the coffee maker can disappear into a panel-ready wall that reads like modern cabinetry.
How to Conceal Without Compromise
- Panel-ready beverage fridge to match the doors.
- Pocket doors that slide back to reveal a coffee or toaster nook.
- Integrated pulls or push latches for a clean, uninterrupted line.
Tip: Run the cabinets all the way to the ceiling (or soffit) to avoid dust shelves. Use a matte lacquer or thermofoil finish for easy wipe-downs.
10. The Texture-Forward Backsplash That Steals the Show
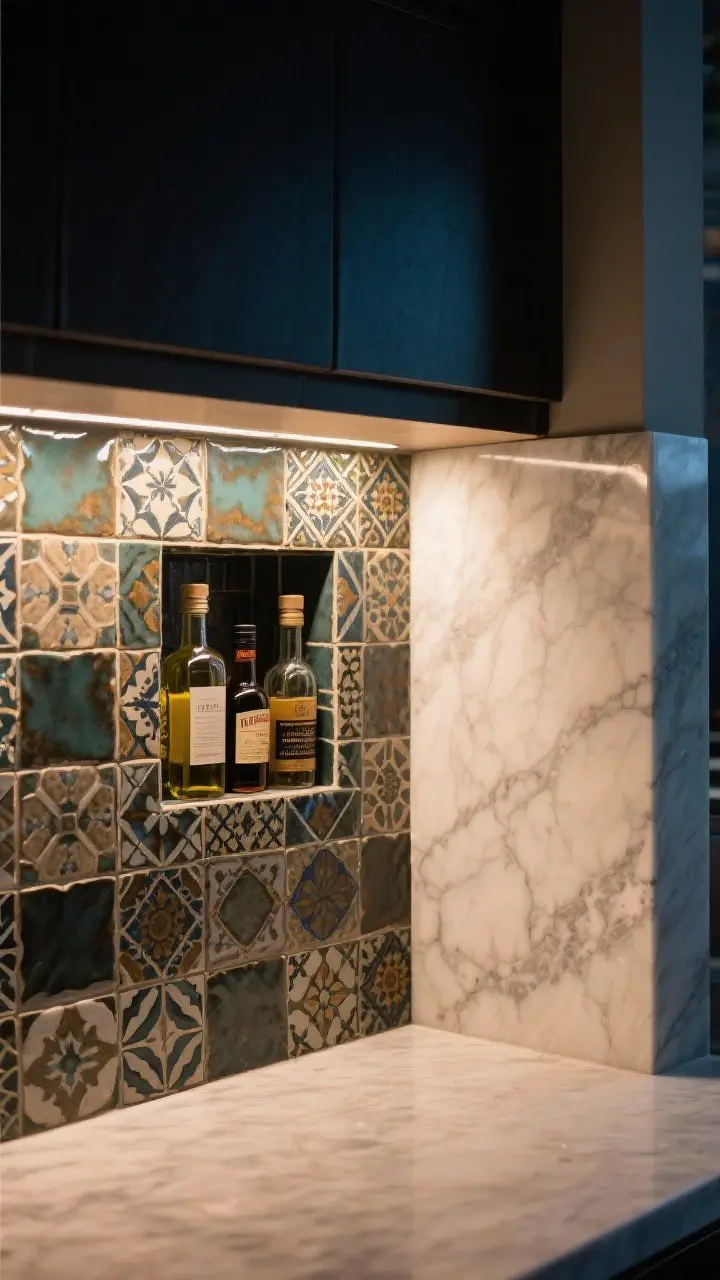
If the kitchenette footprint is small, make your backplash the star. A textured zellige tile, chevron marble, or bold terrazzo adds personality without stealing prep space.
Make It Functional, Too
- Full-height slab backsplash (quartz or porcelain) for zero grout lines.
- Tile niche for oils, syrups, or bar bitters.
- Under-shelf lighting to highlight the texture at night.
FYI: If your basement is humidity-prone, choose a non-porous surface and always use a quality sealer on natural stone.
11. The Kid-Approved Zone That’s Actually Stylish
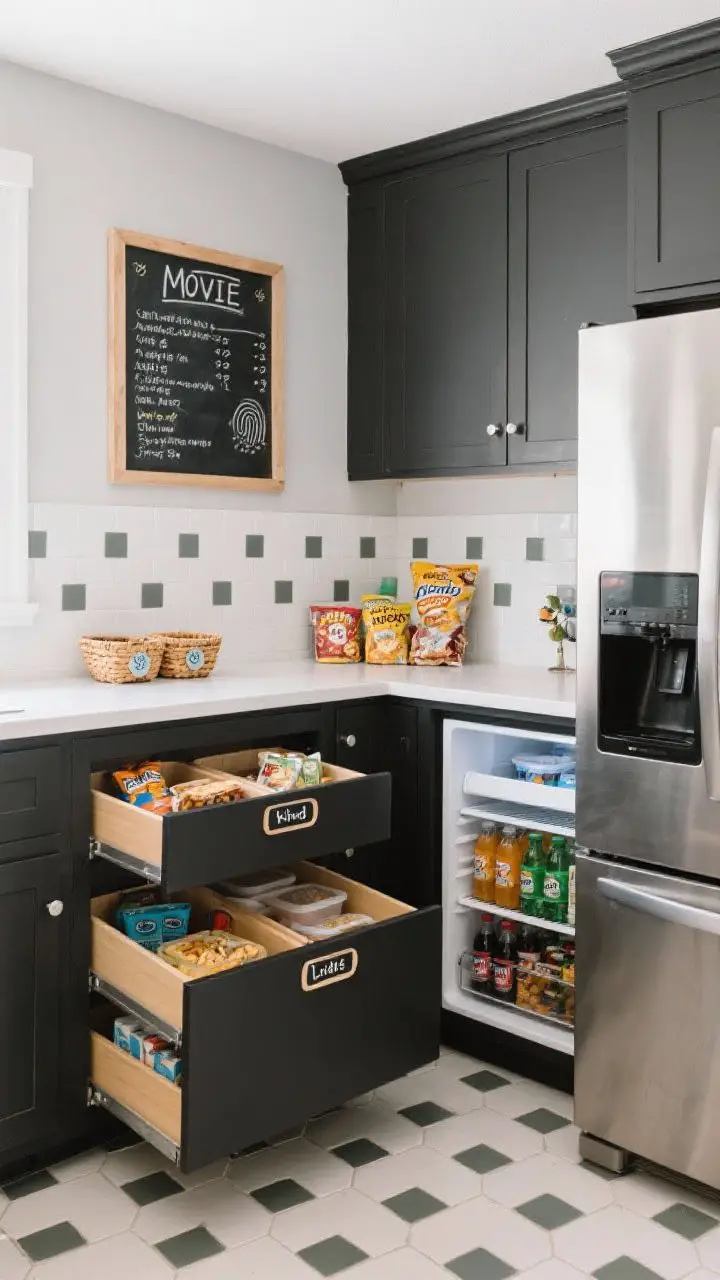
Make a family-friendly kitchenette that looks chic but survives sticky fingers. Durable materials, labeled bins, and a fridge loaded with grab-and-go drinks keep the chaos controlled.
Design With Real Life in Mind
- Fingerprint-resistant stainless or matte black appliances.
- Soft-close drawers with dividers for snacks and lunch prep.
- Open cubbies with baskets—one per kid if you’re ambitious.
Pro tip: Use a peel-and-stick vinyl tile under the snack zone so you can replace a square if spills get out of hand. Mount a magnetic chalkboard for movie-night menus and chore bribes.
12. The Retro-Modern Throwback With Color and Curves
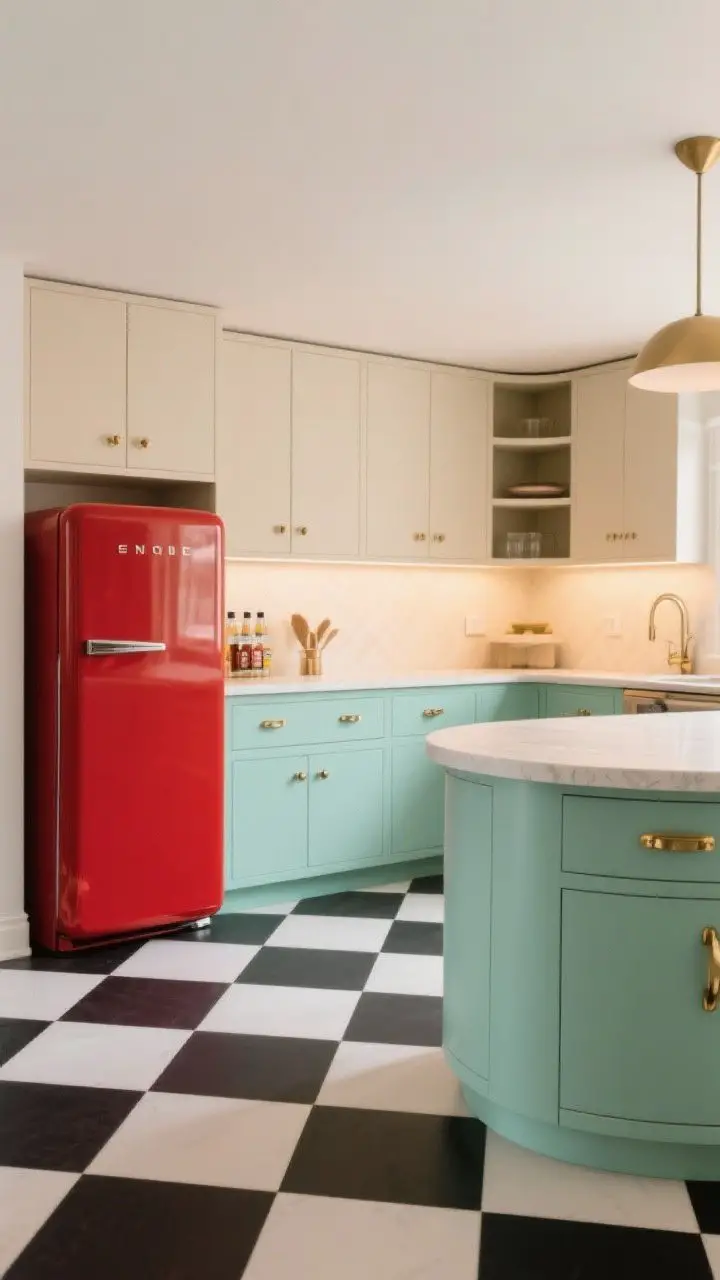
Feeling bold? Go retro-modern with mint or tomato-red cabinets, rounded edges, and mid-century hardware. Pair with checkerboard floors or terrazzo for instant personality.
How to Keep It Fresh, Not Kitschy
- One bold color on lowers, keep uppers neutral.
- Curved corner shelves or a rounded peninsula for softer lines.
- Brushed brass or chrome hardware to finish the look.
Tip: A retro beverage fridge is a fun focal point. Balance it with minimalist lighting so the space still feels current.
Planning Basics You Shouldn’t Skip
- Ventilation: Even without a range, plan for airflow if you’re microwaving or using an induction hob.
- Moisture management: Dehumidifier + good insulation. Seal concrete floors before laying LVP.
- Electrical: Add more outlets than you think you need. Dedicated circuits for fridge, microwave, and dishwasher are smart.
- Plumbing: If a gravity drain isn’t feasible, a sink pump can save the day.
- Lighting: Mix overhead cans, task lights, and accent LEDs on dimmers so you’re not cooking in a spotlight.
Budget Savers That Still Look Luxe
- Semi-custom cabinets with upgraded hardware—big look, smaller bill.
- Quartz remnant countertops from a local fabricator.
- Peel-and-stick backsplash as a placeholder until you tile.
- Floor model appliances or certified refurbished—great for beverage fridges.
Bottom line: your basement kitchenette doesn’t need to be big or bougie to be amazing. It just needs to work for how you live—and look good while doing it.
Pick one of these ideas, start with lighting and layout, and layer in finishes you love. Next movie night, you’ll have snacks, drinks, and compliments on tap. Cheers to your new favorite corner of the house.